An organized and Neat garage space is on everyone’s dream list. And by installing overhead storage is the best way to achieve this. It cannot be emphasized enough how overhead garage storage racks can add value to your garage space by keeping your workshop stuff, seasonal items, and other things that don’t belong anywhere else at home. Maximizing the ceiling space will free up floor space for the needed activities in the garage and store more oversized items such as your vehicles or workbenches.
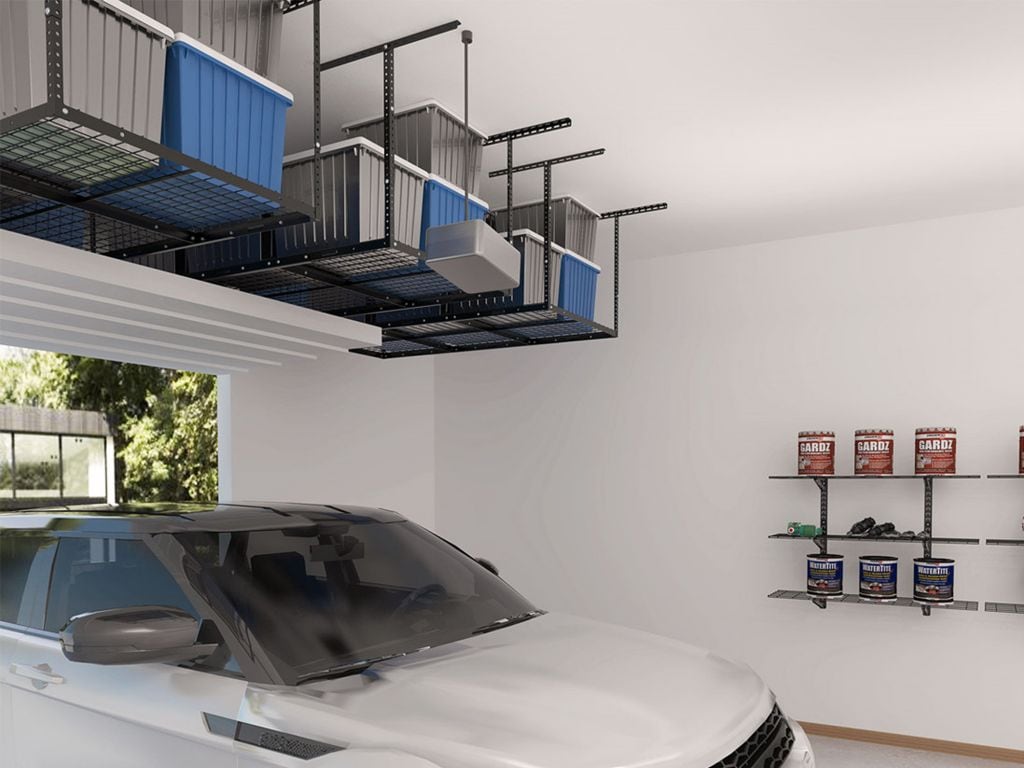
This Classic 4’ x 6’ Overhead Garage Storage employs a ceiling-type installation with safe and high loading capacity due to its high-quality construction. The sturdy and stable design is made possible as the grid design and frame are welded together, and the material used is heavy-cold rolled steel. It can carry a weight of up to 450 lbs. Moreover, Fleximounts provides thicker screws than other brands that offer overhead garage storage. Furthermore, the Fleximounts screws go through strict tests.This garage storage is height adjustable from 22” to 40” ceiling drop-down. It is perfect for customizing the height fit perfectly for you and your garage space, and it is also suitable for securing either ceiling studs or solid concrete ceilings.Optimizing overhead garage storage is advantageous in avoiding flood damage by storing your things off the garage floor, protecting your items. It will also make your garage look neat and get away from insects and rodents. The integrated grid design is made for easier assembly.Trust us when we say that you do not need to be a pro in construction when installing our overhead garage storage racks. Even newbies can assemble the racks in no time. Everything you need to know when it comes to installation, you can find in the package. Moreover, this article will let you follow the step-by-step guide for easier understanding.
What’s in the box
Everything you need is neatly tucked in one box: all the necessary hardware and instructions are included. An installation template is also included to help you devise a plan to store your stuff in the most efficient manner possible. Indeed, this will give you the tips and know-how to organize your garage without a sweat.Inside the single box, you will find the following: the shelves, rack installation manual, and screw sets.Rack Parts
In an open area in your garage or lawn, take out all the box contents. Have another person help when installing for a safer and quicker process.
Plan the installation location.
First, you must determine if the ceiling rack will be installed perpendicularly or parallelly to the direction of the ceiling joists. For a parallel installation, ensure that the ceiling joists are 48” apart. Otherwise, install perpendicularly.
Use a stud finder to locate the joists if the ceiling is finished with drywall.
For parallel installation of ceiling brackets, use a stud finder to locate the wooden ceiling joists.
Then, use the installation template to mark the mounting points. The installation template is reusable for marking mounting points on each side.
Drill a 2.4” or 60mm deep, 0.18” or 4.5mm diameter pilot hole at the center of each marked point.
Install the ceiling brackets using tapping screws and tighten them with a socket wrench.
For perpendicular installation of ceiling brackets, use a stud finder to locate the wooden ceiling joists.
Then, use the installation template to mark the mounting points. Note that the installation template is reusable for marking mounting points on each side.
Drill a 2.4” or 60mm deep, 0.18” or 4.5mm diameter pilot hole at the center of each marked point.
Install the ceiling brackets using tapping screws and tighten them with a socket wrench.
Next, assemble the vertical posts.
Determine the hanging height and then attach the L-shaped upper vertical posts with L-shaped lower points using the M8 x 15 mm bolts and M8 nuts. Make sure that the length of all the vertical posts is uniform.
Tighten with a socket wrench and hex key. To avoid the misalignment of holes when installing the screws, do not tighten any screws until all screws are loosely installed. Then, tighten the screws one by one.
Next, attach the vertical posts to the ceiling brackets.
Attach the L-shaped vertical posts to the ceiling brackets using the M8 x 15 mm bolts and M8 nuts. Tighten them with a socket wrench and hex key. Always install the vertical posts outside. Otherwise, the ceiling brackets will bend, which will cause property damage or, worse, personal injury in case the stored items fall.
Next, assemble and attach the wire grids.
Assemble the wire grids side by side.
Attach them using the M8 x 10 mm bolts.
Tighten with a hex key. To avoid misalignment of holes when installing the screws, do not tighten any screws until all screws are loosely installed. Then, tighten the screws one by one.
Attach the connecting plates at the joints using the M8 x 10 mm bolts.
Tighten with a hex key.
Next, place and attach the wire grids.
Insert the wire grid set. The corners of the grid fit into the slot of the L-shaped vertical posts.
Tighten the M8 x 10 mm bolts using a hex key.
Double-check all screws before you are done. Ensure that all are thoroughly tightened.
You can now load up your ceiling shelf and declutter your garage.
Installation Tips
Use of Metal Expansion Bolt. The metal expansion bolt is needed if installed on a concrete ceiling. However, the metal expansion bolts are not included in the package and must be provided by the customer.
Installing on Slanted Ceiling. One can install the Fleximounts ceiling rack on a slanted ceiling by adjusting the length of the vertical angle post assemblies. Ensure that the angle of inclination is within 15 degrees. And the ceiling rack must be installed with a horizontally level storage platform and vertically-leveled vertical angle posts.
Installing against Wall. One can install the Fleximounts ceiling rack against the wall on one end by attaching the vertical posts to the wall studs. However, the wall studs must be 72” apart. The additional hardware needed in installing is not included in the package.
 This Classic 4’ x 6’ Overhead Garage Storage employs a ceiling-type installation with safe and high loading capacity due to its high-quality construction. The sturdy and stable design is made possible as the grid design and frame are welded together, and the material used is heavy-cold rolled steel. It can carry a weight of up to 450 lbs. Moreover, Fleximounts provides thicker screws than other brands that offer overhead garage storage. Furthermore, the Fleximounts screws go through strict tests.
This garage storage is height adjustable from 22” to 40” ceiling drop-down. It is perfect for customizing the height fit perfectly for you and your garage space, and it is also suitable for securing either ceiling studs or solid concrete ceilings.
Optimizing overhead garage storage is advantageous in avoiding flood damage by storing your things off the garage floor, protecting your items. It will also make your garage look neat and get away from insects and rodents. The integrated grid design is made for easier assembly.
Trust us when we say that you do not need to be a pro in construction when installing our overhead garage storage racks. Even newbies can assemble the racks in no time. Everything you need to know when it comes to installation, you can find in the package. Moreover, this article will let you follow the step-by-step guide for easier understanding.
This Classic 4’ x 6’ Overhead Garage Storage employs a ceiling-type installation with safe and high loading capacity due to its high-quality construction. The sturdy and stable design is made possible as the grid design and frame are welded together, and the material used is heavy-cold rolled steel. It can carry a weight of up to 450 lbs. Moreover, Fleximounts provides thicker screws than other brands that offer overhead garage storage. Furthermore, the Fleximounts screws go through strict tests.
This garage storage is height adjustable from 22” to 40” ceiling drop-down. It is perfect for customizing the height fit perfectly for you and your garage space, and it is also suitable for securing either ceiling studs or solid concrete ceilings.
Optimizing overhead garage storage is advantageous in avoiding flood damage by storing your things off the garage floor, protecting your items. It will also make your garage look neat and get away from insects and rodents. The integrated grid design is made for easier assembly.
Trust us when we say that you do not need to be a pro in construction when installing our overhead garage storage racks. Even newbies can assemble the racks in no time. Everything you need to know when it comes to installation, you can find in the package. Moreover, this article will let you follow the step-by-step guide for easier understanding.