Workbenches are a staple at any garage workshop. Most of your time doing projects is done on a worktop, which only proves that the first investment that you would be making is purchasing a workbench. As there is a myriad of workbenches available in the market, and while all are possible candidates for your garage, you must have a checklist of what kind of features you want to have in your workbench. Well, on top of it, the workbench should be sturdy and spacious. With all the tools and materials you would be needing all at once, it is only fitting for that first requirement. Next would be, also in relation to the first ones, is having built-in shelves takes the cake on this one. The effort and time to walk back and forth every time you would be needing another tool or material will be cut significantly as having shelves to store these items makes it possible for you to reach with less effort.
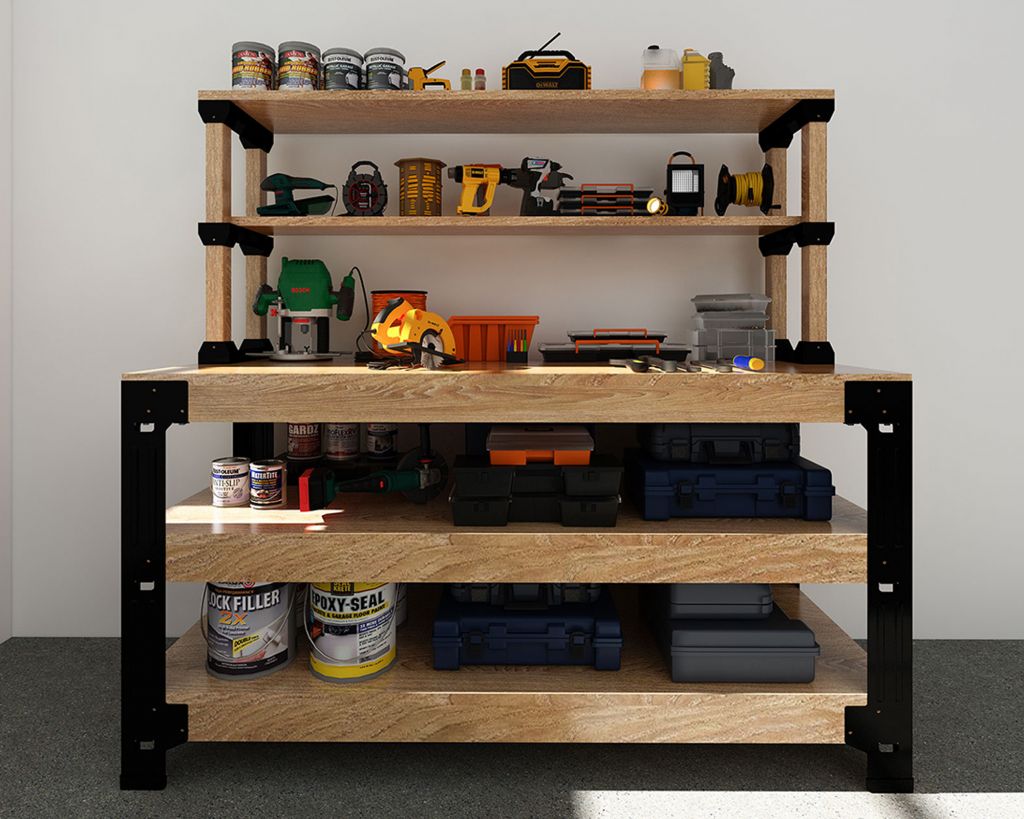
One such reliable workbench that you can maximize when working is the Fleximounts WB107 Customizable Workbench Shelving Frame, which is priced at $89.99 to $94.99.This workbench is made of heavy-duty steel, specifically iron-made workbench legs, making it possible to store twice the storage than traditional workbenches. Its iron-made workbench legs last for years. Plus, it has top-quality stainless steel screws. The workbench has a loading capacity of up to 1000 lbs per shelf, offering dependable load-bearing performance.The WB107’s lumber color and finish can be customizable to suit your taste–you can stain, paint or finish the wood as desired. The maximum dimension of the workbench is 96 inches in length, 48 inches in width, and adjustable in height. The workbench is flexible enough to be utilized for multiple uses for the garage, such as assembling tables, potting benches, or even as a study desk for home. Moreover, building this workbench on your own at the comfort of your home garage is possible as the package already includes all the necessary hardware.
What’s in the box
Here are the parts and accessories included in the package:
4 Table Legs
4 Table Leg Covers
4 Triangular Fixed Plates
6 Shelf Holders
76 Screws
Here are the tools you need for assembling the workbench
Wood Saw
Pencil
Cordless Power Drill
Tape Measure
Safety Glasses
Screw Driver
We recommend using an electric drill for tightening the screws and bolts for faster installation.
Here are the quantity and dimensions of the wood materials needed
However, do note that the following recommendations are for the most popular workbench dimensions. Additional size configurations are available if desired.To build a 3 ft x 6 ft workbench (in length x width x thickness):
3 Boards (72 x 36 x 0.8-1.2 inches)
1 Board (72 x 8.9 x 0.8-1.2 inches)
1 Board (72 x 13.8 x 0.8-1.2 inches)
2 Lumbers (69 x 3.5 x 1.5 inches)
2 Lumbers (36 x 3.5 x 1.5 inches)
4 Lumbers (69 x 3.5 x 1.5 inches)
4 Lumbers (36 x 3.5 x 1.5 inches)
1 Lumber (74.5 x 3.5 x 1.5 inches)
4 Lumbers (H x 2.3 x 1.5 inches)
To build a 2 ft x 4 ft workbench (in length x width x thickness):
3 Boards (48 x 24 x 0.8-1.2 inches)
1 Board (48 x 8.9 x 0.8-1.2 inches)
1 Board (48 x 13.8 x 0.8-1.2 inches)
2 Lumbers (45 x 3.5 x 1.5 inches)
2 Lumbers (24 x 3.5 x 1.5 inches)
4 Lumbers (45 x 3.5 x 1.5 inches)
4 Lumbers (24 x 3.5 x 1.5 inches)
1 Lumber (47.7 x 3.5 x 1.5 inches)
4 Lumbers (H x 2.3 x 1.5 inches)
Easy step-by-step guide when installing the WB107
Install the one-side table leg.
Insert the table leg cover and triangle fixed plate into the table leg. There are four sets in total.
Use a cordless power drill to fix the six wood planks to the installed four table legs using 24 screws.
Install the beam of the workbench.
Using a cordless power drill, fix the six woods to the installed table leg set with 12 screws.
Install the table legs on both sides.
Place the two woods on the middle and lower beams of the table. Use the cordless power drill to fix the table legs with the 12 screws.
Install the upper tabletop.
Place the board on the triangle fixed plates, and place the wood on top of the table to complete the installation of the workbench.
Install the shelf holder set.
Insert the shelf holder into the wood. Fix them with 12 screws using the cordless power drill. There are four sets in total. Note that the position of the middle shelf holder can be adjusted according to the demand, but the two sets must be horizontal.
Install the shelf.
Place the 8.9-in and 13.8-in wood boards on the shelf holder set. Fix them with the eight screws using a cordless power drill.
Install the shelf and workbench.
Place the shelf at the back part of the top of the workbench. Using a cordless power drill, fix them with eight screws.
Safety tips
The workbench can be installed effortlessly by a lone individual as the installation guide is easy to comprehend and very straightforward, but we recommend that two people will complete the installation together. However, if you are unsure about any of the steps in the installation guide, feel free to contact customer service, or ask for help from more experienced individuals or professional installers. When installing, kindly wear safety clothes and use appropriate tools.Also make sure that before attempting to install the workbench, carefully check all materials included in the package. Also, after finishing installing, ensure that the assembly of the workbench is correct and complete before you start using it.The self-prepared wood materials should ensure sufficient strength. The weight capacity of 100 lbs is just a reference value. The actual weight capacity is to be determined according to the specific material used.If you have children or pets at home, keep the small parts in the package such as the screws out of their reach as these materials are choking hazards.And lastly, this product is intended for indoor use only. The use of this product outdoors could lead to product damage or physical injury.
 One such reliable workbench that you can maximize when working is the Fleximounts WB107 Customizable Workbench Shelving Frame, which is priced at $89.99 to $94.99.
This workbench is made of heavy-duty steel, specifically iron-made workbench legs, making it possible to store twice the storage than traditional workbenches. Its iron-made workbench legs last for years. Plus, it has top-quality stainless steel screws. The workbench has a loading capacity of up to 1000 lbs per shelf, offering dependable load-bearing performance.
The WB107’s lumber color and finish can be customizable to suit your taste–you can stain, paint or finish the wood as desired. The maximum dimension of the workbench is 96 inches in length, 48 inches in width, and adjustable in height. The workbench is flexible enough to be utilized for multiple uses for the garage, such as assembling tables, potting benches, or even as a study desk for home. Moreover, building this workbench on your own at the comfort of your home garage is possible as the package already includes all the necessary hardware.
One such reliable workbench that you can maximize when working is the Fleximounts WB107 Customizable Workbench Shelving Frame, which is priced at $89.99 to $94.99.
This workbench is made of heavy-duty steel, specifically iron-made workbench legs, making it possible to store twice the storage than traditional workbenches. Its iron-made workbench legs last for years. Plus, it has top-quality stainless steel screws. The workbench has a loading capacity of up to 1000 lbs per shelf, offering dependable load-bearing performance.
The WB107’s lumber color and finish can be customizable to suit your taste–you can stain, paint or finish the wood as desired. The maximum dimension of the workbench is 96 inches in length, 48 inches in width, and adjustable in height. The workbench is flexible enough to be utilized for multiple uses for the garage, such as assembling tables, potting benches, or even as a study desk for home. Moreover, building this workbench on your own at the comfort of your home garage is possible as the package already includes all the necessary hardware.