Installation Guide: Pro 4′ X 8′ Overhead Garage Storage Rack GR48M
10/19/2021
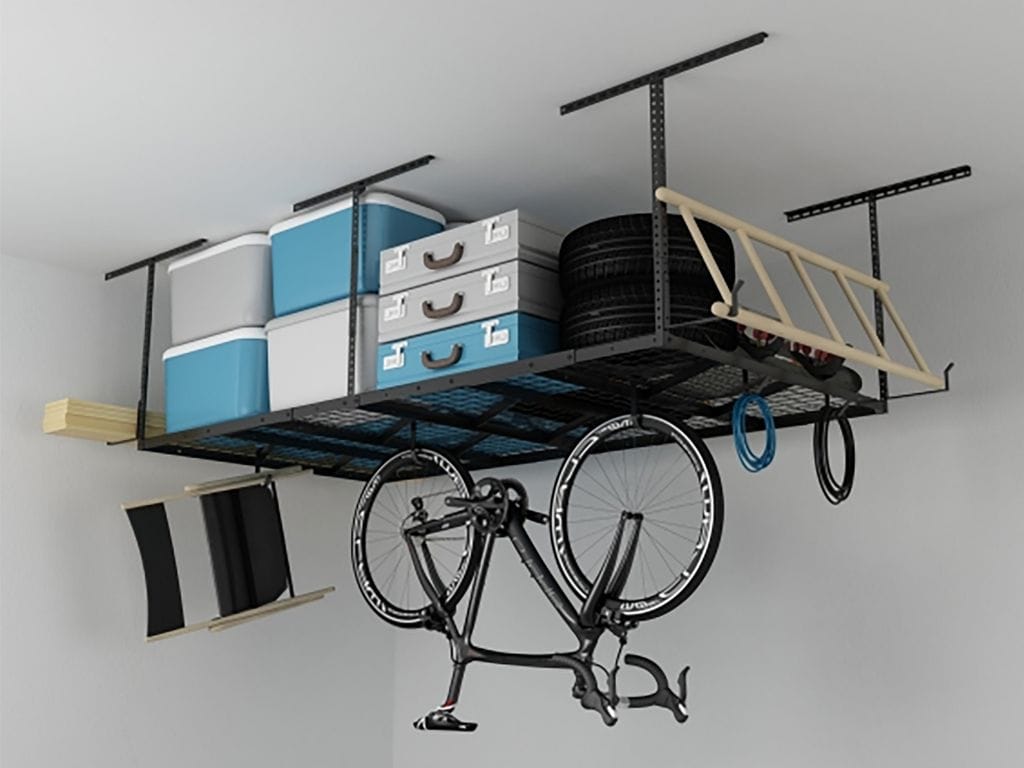
This Fleximounts Pro 4′ X 8′ Overhead Garage Storage Rack GR48M is built with heavy-duty in mind, as the reinforced hanging garage storage wire deck design guarantees a high loading capacity of up to 800 lbs. But you need not worry because the quality construction of this rack assures safe and high loading capacity. For added stability and safety, the ample vertical supports longer ceiling brackets and a larger contact surface. The screws that are included in the package are thicker compared to the others available in the market and went through strict tests to assure the quality of the hardware. Moreover, the rack is also waterproof, which protects the stored items from getting damaged due to water or liquid leakage in your garage.The GR48M offers flexible installation as you can practically mount the garage ceiling storage racks nearly anywhere. With Fleximounts smart joist configuration, you can mount the rack in both wood and concrete at any position–perpendicular, parallel, and even on slanted ceilings. Just make sure that you maintain 48-in. Distance in between the vertical posts. Use a stud finder to locate the joists if the ceiling is finished with drywall.What’s more is that the garage rack can easily be expanded with hooks and clamps to store more items like bikes, tools, cables, and more.
What’s in the box
Here are the rack parts included in the package:
6 Ceiling Brackets
4 L-Shaped Upper Vertical Posts
2 Upright Upper Vertical Posts
4 L-Shaped Lower Vertical Posts
2 Upright Lower Vertical Posts
4 Connecting Plates
4 Wire Grids
2 Wire Grids
Here are the screw sets included in the package:
12 St8.0 x 60 Tapping Screws
12 M8 x 15 mm Bolts
12 M8 Nuts
1 Socket Wrench
1 5x5 mm Hex Key
6 M8 x 15 mm Bolts
6 M8 Nuts
22 M8 x 15 mm Bolts
8 M8 x 15 Bolts
Also included in the package are the installation instructions and template to help with the do-it-yourself construction of the rack. You do not need to fret as the instructions are easy to follow. Although basic knowledge when using the hardware is a big plus, newbies can still construct the rack in no time.
Tools needed when installing the GR48M
Pencil
Cordless Power Drill
Tape Measure
Safety Glasses
Screwdriver
Stud Finder
Ladder
Wrench
For a faster installation process, you may opt to use an electric drill for tightening the screws and bolts.
Easy step-by-step guide when installing the GR48M
In an open area in your garage or lawn, unbox the package. You should have four shelves, and the total size of these is 4’ x 8’.
Layout the hanging brackets. Group them according to their ends.
Start with the support brackets. Join each 4x4 square together. You will complete this task four times. Do not join the two 4x4 squares together yet. Ensure you are using the standard flat top bolts.
Once the support brackets are on, you can fill the empty bolt holes between the two pieces. Do this for both sides and tighten completely.
Once complete, take the two pieces and move them out of the way.
Find the best location to install the Fleximounts ceiling rack. You can install it above the open garage door or install it past the end of an open garage door.
Determine the orientation and spacing of joists. Know if the ceiling rack will be installed parallel or perpendicular to the direction of the ceiling joists.
Use a stud finder to locate the joists if the ceiling is finished with drywall. The ceiling joist will either run front to back or side to side. Note: For a parallel installation, ensure that the ceiling joists are 48” apart. If not, install perpendicularly instead.
Install the ceiling brackets.
For parallel installation
Grab the stud finder and find the studs in your ceiling.
Take a pencil. Using the cardboard stencil provided, mark the mounting holes.
Before trying to drill in your screws, take the drill bit. And drill in a couple of pilot holes.
Drill a 2.4” (60mm) deep and 0.18” (4.5mm) diameter pilot hole at the center of each marked point.
Now, with the wood screws provided, mount the first ceiling bracket.
Install the ceiling brackets using tapping screws and tighten them with a socket wrench.
For perpendicular installation
Grab the stud finder and find the joists in your ceiling.
Take a pencil. Using the cardboard stencil provided, mark the mounting holes. Remember to make a mark according to the orientation of the ceiling brackets against the ceiling joists. In this case, the orientation should be perpendicular.
Before trying to drill in your screws, take the drill bit. And drill in a couple of pilot holes.
Drill a 2.4” (60mm) deep and 0.18” (4.5mm) diameter pilot hole at the center of each marked point.
Now, with the wood screws provided, mount the first ceiling bracket.
Install the ceiling brackets using tapping screws and tighten them with a socket wrench.
Start with the second bracket. Measure 48 inches from the other bracket. You can check with the stud finder. But if the first bracket is mounted properly, the second will be in the stud as well.
Use the same steps with the first bracket. After the measurements are accurate, mount them to the ceiling.
Repeat the same process as you did with the others. Drill the pilot holes and then mount the ceiling bracket. These two steps are then repeated to hang the rest of the ceiling brackets. Once you have all six up, you can move on to the next step.
For the next step, you need to figure out the height of the racks to hang. The rule of thumb is to raise the garage door and measure down from the ceiling. Give yourself a good six inches between the door and the rack.
Pull out all the bolts with the round heads. Under the round, heads are small squares. They need to go into the sides of the extender pieces with the square holes.
Now take your four corner hanging arms and mount them to your ceiling brackets. At this point, just hand tighten. Remember that you are just mounting the four corners; the two centerpieces should still not be mounted.
Going back to the last two center arm brackets, mount them the same length as the corner arms.
Take them back up and mount them to the ceiling brackets. And again, just hand tighten them. Ensure that while mounting them that the lips of each are facing inwards.
Take the first 4x4 piece that you previously put together and take it up the ladder. If you can find someone to help you, that would be great. But if you have to do it alone, place it on top of the ladder.
Place it in the corner brackets first. Then place it on the lips of the center brackets.
Have a few screws in your pocket for the center bracket. Place one on each side and finger tighten them. Then go back and place screws in the corner brackets.
Completely tighten them into place.
Assemble the vertical posts.
Attach the upper vertical and lower posts using the included nuts and bolts. Tighten with a socket wrench and hex key. Ensure that the length of all the vertical posts is uniform.
To avoid misalignment of holes when installing screws, do not tighten any screws until all screws are loosely installed. Then, tighten the screws one by one.
Attach vertical posts to ceiling brackets. Make sure that the distance between the posts is consistent at 48 inches apart. Always install the vertical posts between the bolts in the ceiling bracket. Do not attach the vertical posts outside. Otherwise, the ceiling brackets will bend, which may cause personal injury or damage to your stored items if they fall.
Attach L-shaped vertical posts to ceiling brackets using bolts and nuts. Tighten with a socket wrench and hex key.
Attach upright vertical posts to ceiling brackets using bolts and nuts. Tighten with a socket wrench and hex key.
Assemble and attach the wire grid.
Attach the four connecting plates and wire grids using bolts. Tighten with a hex key.
Attach the wire grids in the middle using bolts. Tighten with a hex key.
Insert metal grids into the gaps between metal grids.
Place and attach wire grid.
Insert the wire grid set. The corners of the grid fit into the slot of the L-shaped vertical posts. Tighten the screws with a hex key.
Attach the upright vertical posts with the side of the grid by tightening the screws with a hex key.
Now, you can place the items that need to be stored in the rack. You can also attach Fleximounts hooks to attach your bicycle, tools, cables, and more.
Installation Tip: Use of Metal Expansion Bolt
A metal expansion bolt is needed if installed on a concrete ceiling. However, the metal expansion bolts are not included in the package.
Tap the metal expansion bolt into the mounting hole.
Screw out the nut and washer.
Install the ceiling bracket.
Tighten the nut with a socket wrench.
Installation Tip: Installing on Slanted Ceiling
Fleximounts ceiling rack can be installed on a slanted ceiling by adjusting the length of the vertical angle post assemblies. The ceiling rack must be installed with a horizontally level storage platform, and vertically level vertical angle posts.
Installation Tip: Installing against Wall
The Fleximounts ceiling rack can be installed against the wall on one end by attaching vertical posts to the wall studs. The wall studs must be 48 inches apart. However, the additional hardware needed when installing is not included in the package.
 What’s in the box