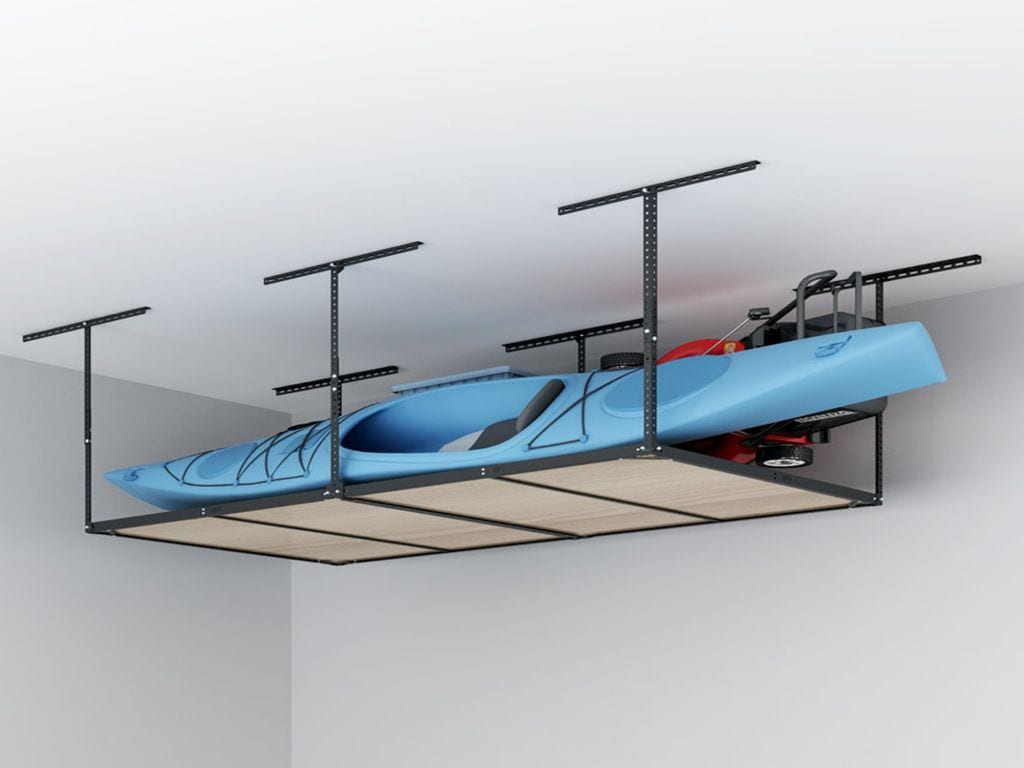
Organizing your garage can be a daunting task. For one, you cannot simply give up your vehicle space to make way for more items to be stored on your garage floor. So, trying to fit all the stuff that you have and sharing it with your car can mean a lot of calculation and creativity.The smart solution for all your woes is installing an overhead garage storage rack. By optimizing the ceiling space and converting it into a storage space would be the perfect solution to decluttering the garage. The unused overhead space can become your haven to store important stuff that needs a new home outside your living space.One such amazing storage is the FleximountsBasic 4′ X 8′ Overhead Garage Storage Rack GR48F. The heavy cold-rolled 14 gauge steel construction ensures long-lasting use and provides safety loading up to 600 lbs with ⅜” plywood or thicker. The high-quality screws provided in the package are thicker than industry standards and have gone through strict tests.The rack is also height adjustable to suit your needs. It can go from 22 inches to 40 inches dropdown and provides up to 105 cu. This is beyond compare to other racks available in the market with a maximum of 33 inches ceiling drop down and a maximum of 88 cu. ft. of storage. The dimensions of the GR48F are 96 x 48 x 22-40 in.Moreover, the Basic 4′ X 8′ Overhead Garage Storage Rack GR48F offers installation practicality as it can be both for parallel and perpendicular installation. In either case, you only have to make sure that the vertical posts are 48 inches apart. If your garage’s ceiling is finished with drywall, you can use a stud finder to locate the ceiling joists.The rack consists of four corner triangles and two frame reinforcement bars. The rack is a specially designed vertical post that allows for embedded deck mounting. And for added peace of mind and security, it has multiple mounting points for attaching the deck and frame firmly with tapping screws.This Fleximounts overhead storage rack provides space for flexibility and creativity as you can customize the color of the wooden decks or even better, recycle the old wooden boards that you have lying around the garage or lawn. But note that the recommended size is 4’x8’ and has a thickness of at least ⅜”. Also, you can opt to choose Fleximounts wire grids as a base or deck for the rack. Either way, it provides sturdy storage for all your unused and seasonal items.Do not worry about the installation as it is easy to comprehend with the installation instructions and template that go with the package. And you do not need to be a construction expert to do such a garage project.
What’s in the box
Here are the rack parts included in the package:
6 Ceiling Brackets
4 L-Shaped Upper Vertical Posts
2 Upright Upper Vertical Posts
4 L-Shaped Lower Vertical Posts
2 Upright Lower Vertical Posts
2 Reinforcement Bars
8 Frame Bars
Here are the set of screws included in the package:
12 St8.0 x 60 Tapping Screws
12 M8 x 15 mm Bolts
12 M8 Nuts
1 Socket Wrench
1 4 x 4 mm hex Key
6 M8 x 15 mm Bolts
6 M8 Nuts
26 M6 x 8 mm Bolts
14 M8 x 15 mm Bolts
14 M8 Cap Nuts
16 St4.2 x 10 Tapping Screws
4 Reinforcement Bars
Tools needed when installing the GR48F
Wrench
Safety Glasses
Stud Finder
Screwdriver
Power Drill
Tape Measure
Pencil
Ladder
For a faster installation process, you may opt to use an electric drill for tightening the screws and bolts.
Easy step-by-step guide when installing the GR48F
Find the best location to install the Fleximounts ceiling rack. You can install it above the open garage door or install it past the end of an open garage door.
Determine the orientation and spacing of joists.
Use a stud finder to locate the joists. The ceiling joist will either run front to back or side to side. Note: For perpendicular orientation, the length of the rack crosses the joists. On the other hand, for parallel installation, the length of the rack runs parallel to the joists. Ensure that the ceiling joists are 48” apart. If not, install it perpendicularly instead.
Install the ceiling brackets.
Locate the wooden ceiling joists using a stud finder. Then, use the provided installation template to mark the mounting points.
Drill holes at the center of each point.
Install the ceiling brackets to the ceiling using tapping screws and tighten with a socket wrench.
Assemble the vertical posts.
Attach the upper vertical and lower posts using the included nuts and bolts. Tighten with a socket wrench and hex key. Ensure that the length of all the vertical posts is uniform.
To avoid misalignment of holes when installing screws, do not tighten any screws until all screws are loosely installed. Then, tighten the screws one by one.
Attach vertical posts to ceiling brackets. Make sure that the distance between the posts is consistent at 48 inches apart. Always install the vertical posts between the bolts in the ceiling bracket. Do not attach the vertical posts outside. Otherwise, the ceiling brackets will bend, which may cause personal injury or damage to your stored items if they fall.
Assemble the frames.
Assemble the 8 bars into two frames.
Assemble the frame reinforcement bar.
Flip over each frame and attach the reinforcement bar.
Attach the frames to vertical posts.
Assemble wooden decking.
Place the board on the frame. Use self-tapping screws to lock in the board and frame from bottom to up. Note: The recommended plywood size is 2 sheets of 4’ x 4’ plywood. And the recommended plywood thickness is ⅜” plywood or thicker.
Installation Tip: Use of Metal Expansion Bolt
A metal expansion bolt is needed if installed on a concrete ceiling. However, the metal expansion bolts are not included in the package.
Tap the metal expansion bolt into the mounting hole.

 What’s in the box