Installation Guide: Fleximounts BRH4 Flexible And Foldable Bike Hitch Rack
Mar 11, 2022
2469 views
Out-of-town trips are more enjoyable when you can also bring your bicycles with you. Imagine a change of scenery from your usual metro, high-rise buildings, and car traffic.But the main concern is how to transport the bike to the destination. Unless you own a foldable bike or a pickup truck, it would not be a problem at all. However, subjecting your bicycle units by laying them out flat on the floor poses a danger to your bikes, especially if the road you will be traversing is rough. And if you are a family or a group of friends traveling, then the space would not be enough.
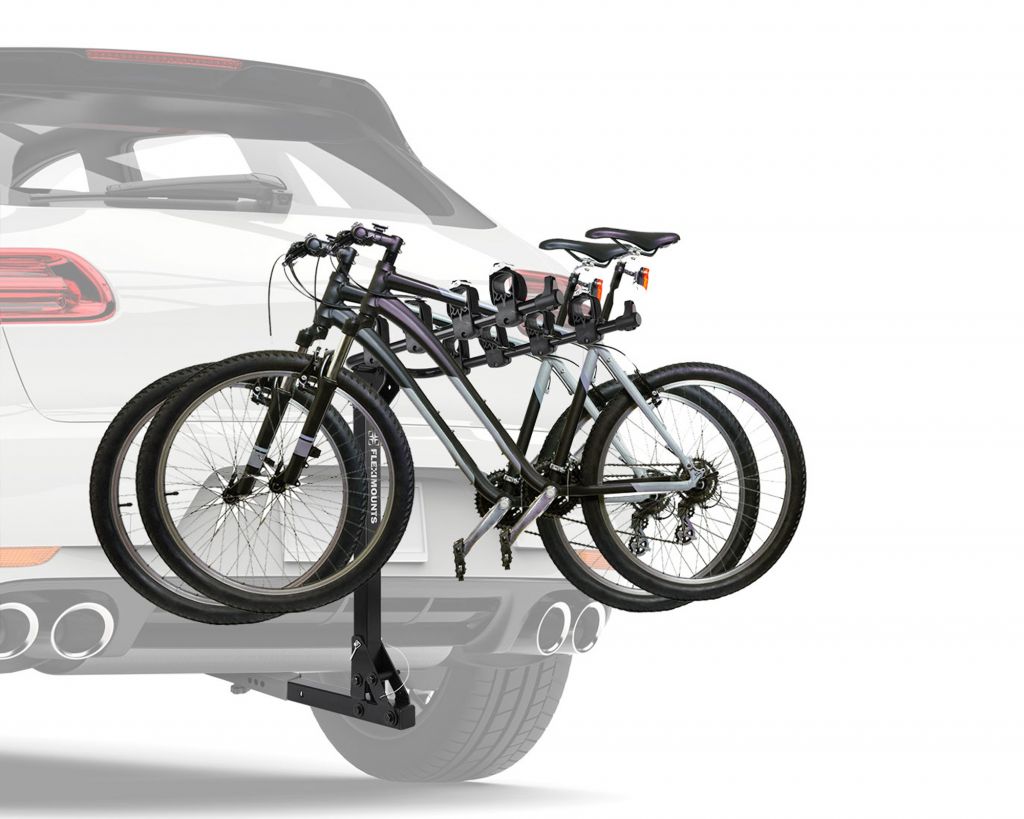
Investing in a sturdy and convenient bike hitch rack is the most plausible remedy that you can bank on. Now, transporting the bicycles would not be much of a hassle.And one such bike rack that you can count on is the Fleximounts BRH4 Flexible And Foldable Bike Hitch Rack, which is priced at $129.99.The Fleximounts Bike Hitch Rack Foldable BHR4 is as durable as you want it to be. It is a cold-roll steel structure with a protective powder paint finish. It has anti-wobble knobs to strengthen the connection between the mainmast and folding arms. It assures you that the build will securely fix the bike rack in place, which would be our biggest worry when on the road. Frequent glances at the back of our car would be lessened with this rack as you will be at ease with its performance.The foldable bike hitch rack features a tiltable mainmast. The rack's body can swing up, down, forward, and backward, allowing more accessible bikes'' lifting. The rack pops back to its original position with the anti-wobble knob.Moreover, its foldable arms are easy to move. So, when the rack is not in use, you can easily fold it back to safekeeping. Even if installed in your vehicle, the foldable arms would not get in the way.The Fleximounts Bike Hitch Rack Foldable BHR4 is compatible with different sizes of bikes, which is perfect for group outings and if you own multiple types of bicycles. The rack has adjustable straps that can hold up to four bikes, and it can carry a weight of up to 165 lbs.
What's in the box
Here are the parts included in the package:
1 pc Rectangular Tube
1 pc Left Triangle Plate
1 pc Right Triangle Plate
1 pc Rectangle Lifting Column
1 pc U-type Tube
Here are the screws included in the package:
4 pcs M12 Bolts of Two Different Lengths
8 pcs M12 Flat Washers
4 pcs M12 Nuts
1 pc M10 Bolt
1 pc M10 Flat Washer
2 pcs M10 Nuts
1 pc Rubber Washer
2 pcs Safety Pins
2 pcs Wrenches
1 pc Hexagonal Bolt
1 pc Safety Pin with Blue White Zinc Plating
Easy step-by-step guide when installing the BHR4
Although assembling and installing this flexible and foldable bike hitch rack is easy to follow using these steps, having basic knowledge of the tools and hardware will definitely help in finishing the process quickly and correctly. Installing it is pretty much a do-it-yourself project. And it only needs essential equipment that is readily available in your garage toolbox.
Unbox the package. The box is rather heavy, so if you have a companion, you might as well seek help to unload the box on a sturdy workbench or the garage floor.
First off is the chassis installation,
Use the hexagonal bolt to connect the rectangular tube with the towing hitch.
Connect the left triangle plate and right triangle plate with the rectangular tube by inserting the M12 bolt, M12 flat washer, M12 nut into the lower hole of the left triangle plate and right triangle plate.
Tighten all the nuts using the wrenches.
Next, install the lifting column.
Insert the M12 bolt, M12 flat washer, M12 nut into the lower holes of the rectangular lifting column.
Put the end of the flash washer upward and in the middle holes of both the left and right triangle plates.
Insert the M12 bolt into the hypotenuse holes of both the left and right triangle plates.
Use the rubber washer to fix it between the triangle plates.
Insert the safety pin into the upper hole of the lower end of the lifting column and the upper holes of both the left and right triangle plates.
Tighten all the nuts using the wrenches.
The next step is to install the U-type tube.
Fix the U-type tube with the rectangular column by inserting the M10 bolt, M10 flat washer, M10 nut into the holes with a flat washer.
Insert the safety pin into the upper holes.
Tighten all the nuts using the wrenches.
Finally, attach to your vehicle when needed. To mount the bicycle units, adjust the flexible straps onto the body of the bike for firm gripping.
Safety Precautions
First and foremost, make sure to read and understand thoroughly the instructions before attempting to install. It is recommended for a minimum of two people to install the rack to avoid property damage or severe injury. If you are unsure of any part of the installation, contact a professional installer for assistance.Third, as the package contains small items that could be a choking hazard or swallowed, keep these items away from young children and pets.Fourth, check the joint parts every two months to make sure that the screws have not loosened.And lastly, this product should not be disposed of as household waste. Instead, one should recycle the bike rack. Use the relevant recycling systems available to you or contact the distributor or manufacturer for recycling assistance.
Manufacturer Warranty
For the Fleximounts Bike Hitch Rack, the warranty is valid for one year from the purchase date. The Fleximounts limited warranty covers the products against defects in material or workmanship. The warranty extends to the original purchaser only and is non-transferable. Only consumers purchasing Fleximounts products from authorized retailers or resellers may benefit from the limited warranty.
 Investing in a sturdy and convenient bike hitch rack is the most plausible remedy that you can bank on. Now, transporting the bicycles would not be much of a hassle.
And one such bike rack that you can count on is the Fleximounts BRH4 Flexible And Foldable Bike Hitch Rack, which is priced at $129.99.
The Fleximounts Bike Hitch Rack Foldable BHR4 is as durable as you want it to be. It is a cold-roll steel structure with a protective powder paint finish. It has anti-wobble knobs to strengthen the connection between the mainmast and folding arms. It assures you that the build will securely fix the bike rack in place, which would be our biggest worry when on the road. Frequent glances at the back of our car would be lessened with this rack as you will be at ease with its performance.
The foldable bike hitch rack features a tiltable mainmast. The rack's body can swing up, down, forward, and backward, allowing more accessible bikes'' lifting. The rack pops back to its original position with the anti-wobble knob.
Moreover, its foldable arms are easy to move. So, when the rack is not in use, you can easily fold it back to safekeeping. Even if installed in your vehicle, the foldable arms would not get in the way.
The Fleximounts Bike Hitch Rack Foldable BHR4 is compatible with different sizes of bikes, which is perfect for group outings and if you own multiple types of bicycles. The rack has adjustable straps that can hold up to four bikes, and it can carry a weight of up to 165 lbs.
Investing in a sturdy and convenient bike hitch rack is the most plausible remedy that you can bank on. Now, transporting the bicycles would not be much of a hassle.
And one such bike rack that you can count on is the Fleximounts BRH4 Flexible And Foldable Bike Hitch Rack, which is priced at $129.99.
The Fleximounts Bike Hitch Rack Foldable BHR4 is as durable as you want it to be. It is a cold-roll steel structure with a protective powder paint finish. It has anti-wobble knobs to strengthen the connection between the mainmast and folding arms. It assures you that the build will securely fix the bike rack in place, which would be our biggest worry when on the road. Frequent glances at the back of our car would be lessened with this rack as you will be at ease with its performance.
The foldable bike hitch rack features a tiltable mainmast. The rack's body can swing up, down, forward, and backward, allowing more accessible bikes'' lifting. The rack pops back to its original position with the anti-wobble knob.
Moreover, its foldable arms are easy to move. So, when the rack is not in use, you can easily fold it back to safekeeping. Even if installed in your vehicle, the foldable arms would not get in the way.
The Fleximounts Bike Hitch Rack Foldable BHR4 is compatible with different sizes of bikes, which is perfect for group outings and if you own multiple types of bicycles. The rack has adjustable straps that can hold up to four bikes, and it can carry a weight of up to 165 lbs.