There are stray tools everywhere, boxes here and there, and a lot of mess in different corners. With that kind of mayhem in your garage area, for sure you don’t want opening it or even seeing the inside of it. If you’re in that kind of situation, you might want to consider starting your organization plan. You may go DIY or purchase different garage shelves as garage storage.
Organizing your garage isn’t a one-time job. It requires dedicated time for planning and deciding how you want to organize and if you want to convert it to something else for presentation purposes. You can try putting some wooden touch or decorate it to make it look more modern.
Different wooden DIY projects for your garage
You don’t need a lot of cash and space if you know how to do some organization or conversion yourself. You just need your creative mind and some house tools to start your project. Here are some wooden do-it-yourself projects to kick-off your organization.
Brackets made of scrap wood
These brackets can serve as the place for your folding chairs and lawnmowers. This is the cheapest project you can do because you just need to find some scrap woods, screws, and a wall stud where you can fix your bracket.
How to do the scrap wood brackets: (1) Get any scrap lumber in your garage; (2) Cut these lumbers into 7 ¾ in. long with a 30-degree angle on one end; (3) Fasten a pair of these brackets, directly across each other, with a three 2-inches screws onto an exposed wall stud, and there you’ve got a perfect place for your folding chairs and lawnmowers.
Wooden garage shelves
Resident carpenter of Family Handyman magazine, Joe, discussed his experience installing a wooden wall shelf in his own garage. He did it by himself to save cost and so he could style it the way he wanted. Everybody thinks he’s a genius because he just spent $300 for a 26-feet wall shelf that he did for less than a day.
Here’s how Joe did it: (1) Cut all the frame parts to length and mark where the rails are going to be screwed; (2) Find the most straightforward piece of plywood and work on top of that to help you keep each frame squared up when you screw them; (3) When you’re ready to install the shelves, ask a friend to help you out, or if you prefer working alone you can lean one of the frames on the wall to hold while you screw the other side; (4) Make sure to find a wall stud to fasten your wooden shelves. You can use construction screws to make sure that your shelf is sturdy; (5) Install the middle cleats for sliding bins. You can use a spacer to mark where you should screw the cleats; (6) Paint your shelves according to what you like.
According to Joe, it’s better to buy your storage first before actually creating the shelf, by doing that you can customize the size of each storage unit.
If you are not comfortable with wooden shelves, you can also try Fleximounts’ garage shelves. These are perfect to create a modern vibe in your garage. You can also think about how you can style each shelf to make it more pleasing to the eyes.
Wooden overhead garage storage
Before including overhead storage into your organization plan, check first your ceiling joists and make sure that it’s strong enough to carry baggage. Also, make sure that this won’t get in the way of your car or the garage door when opened.
So, how you can do it: (1) Measure the height from the opened garage door to the ceiling. You need to subtract at least 1-inch to determine the height of your storage. (2) Find out which way your ceiling joist run, then (3) hang one shelf support from three adjacent joists. (4) Attach the corner braces on both ends of the shelf support. (5) Finish the shelf unit by attaching the 3/8-in. x 4-ft. x 6-ft. plywood.
A plywood overhead shelf can typically carry 160 lbs of weight, so make sure to just put medium to lightweight things above.
Yard tool organizer
It’s better to have even a makeshift yard tool organizer in your garage so your tools won’t be lying around in the area.
Here’s how you can create one: (1) Get two 1X4 board feet of lumber. (2) Drill a series of 2-inches holes on the first lumber. Make sure to center each hole about 1-inch from each edge. (3) Screw this board to the other 1X4 lumber and add 45-degree brackets to keep it from sagging. Since this organizer will carry a bunch of tools, it’s much better to also attach it to a wall stud.
You can use this organizer to hang any of the tools you think will fit.
Use a pallet to store garden equipment
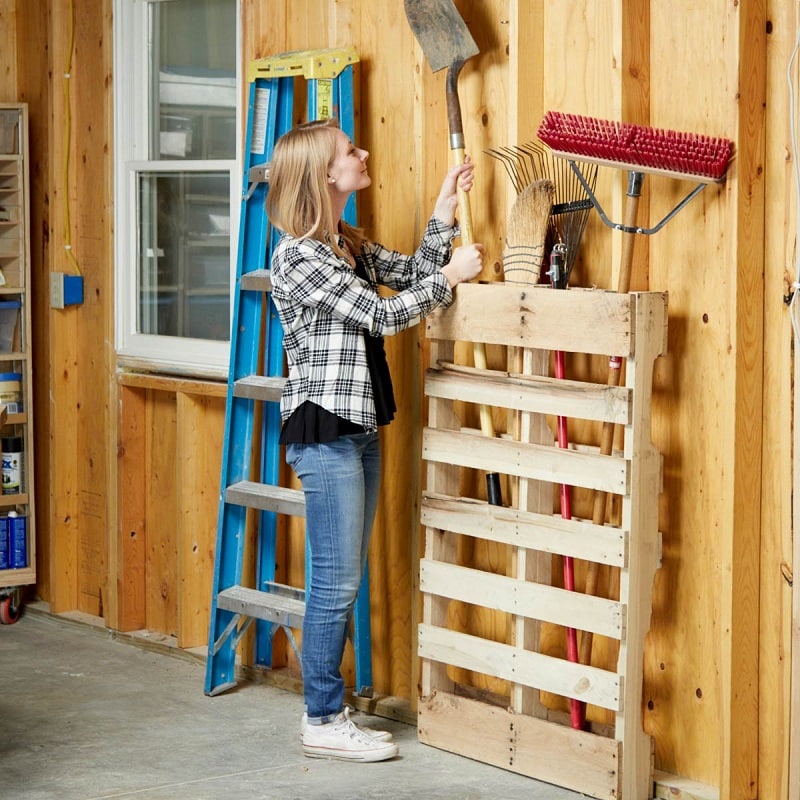
Garden equipment is most of the time long-handled equipment. These tools, since they are long, are the culprit for your stumbling over the garage when you are in there looking for something in dim light. A pallet organization hack is the best organization tool for you – all you need is a pallet, a couple of screws, and a drill.
How to do it: Attach your pallet to an exposed wall stud with a screw. Make sure that your screws are long enough to go through your pallet and the wall. In just an easy step, you now have a tray for your shovel, rake, and other garden equipment. You can also store broomstick or other lumber lying around your garage.
There are many different ways to keep your garage organized. The abovementioned examples are just some of the easiest and cheapest do-it-yourself organization project.
Other easy tips to make your garage look systematic
If you love DIY, you can easily transform your home with the way you want. Styling and decorating to make it more presentable will be very easy. Here are other garage organization projects to satisfy your systematic self.
Have a portable lumber rack
Lumbers are everywhere if you don’t have a dedicated place for them. You will just put them where there’s space, and the last thing you’ll notice is that your garage area looks very crowded and dusty. To avoid this mess, have a portable lumber rack.
Do this rack using lumber scraps in your area. You can make it look like a ladder that’s assembled in a triangle shape. Add swivel casters at the bottom so you can move it or carry it around when you have projects to do in your house. You can also assemble top rack so you’ll have somewhere to put small lumbers or even small tools. No more lumbers just lying around.
Try making crate cabinet with sliding drawers
Not that crate cabinets and really stylish (if you’re into edgy designs), but these drawers give you more room for organization. If you have toys, crafts, tools, fabrics, and other materials, you can store all of them divided into drawers.
Head to Home Depot or another material store to buy the things that you need to create one: crates, poplar planks, oak veneer plyboard for the top, oak veneer tape, 16” drawer slides, miter saw, circular saw, Kreg pocket hole jig, drill, clamps, hammer, clamping square, metal woodworking rule, wood glue, finishing nails, and deck screws.
Here are the steps on how to do it: (1) Start your project by cutting the poplar planks with the miter saw on the height of the cabinet you desired. (2) Cut 12 pieces of 11” poplar planks to support sides and bottom of the cabinet. (3) Cut three pieces of 15” poplar planks for the back of the cabinet. (4) Cut eight pieces of 1 1/4” x 16 1/2” boards to attach to the inside of each crate where the drawer slides will be attached. Then attach the drawer slides. (5) Attach the top and bottom connecting pieces using a Kreg Jig to make pocket holes. (6) Attach the drawer slides to the frame. Make sure that the cabinet is wide enough to fit the drawers and slides. (7) Use Clamping squares, clamps, and a scrap board to square the cabinets. Then screw the bottom supports into place. (8) For finishing touches, cover the raw edges of the plywood with oak veneer tape.
Just like that, you have a do-it-yourself crate cabinet with a sliding drawer.
There are tons of ways and online tips on how you can make your garage look pretty organized and decent. You just need ample of patience if you’ve decided to do everything by yourself. If you’re tired of looking for inspirations, head on to www.fleximounts.com for garage organization and conversion tips.