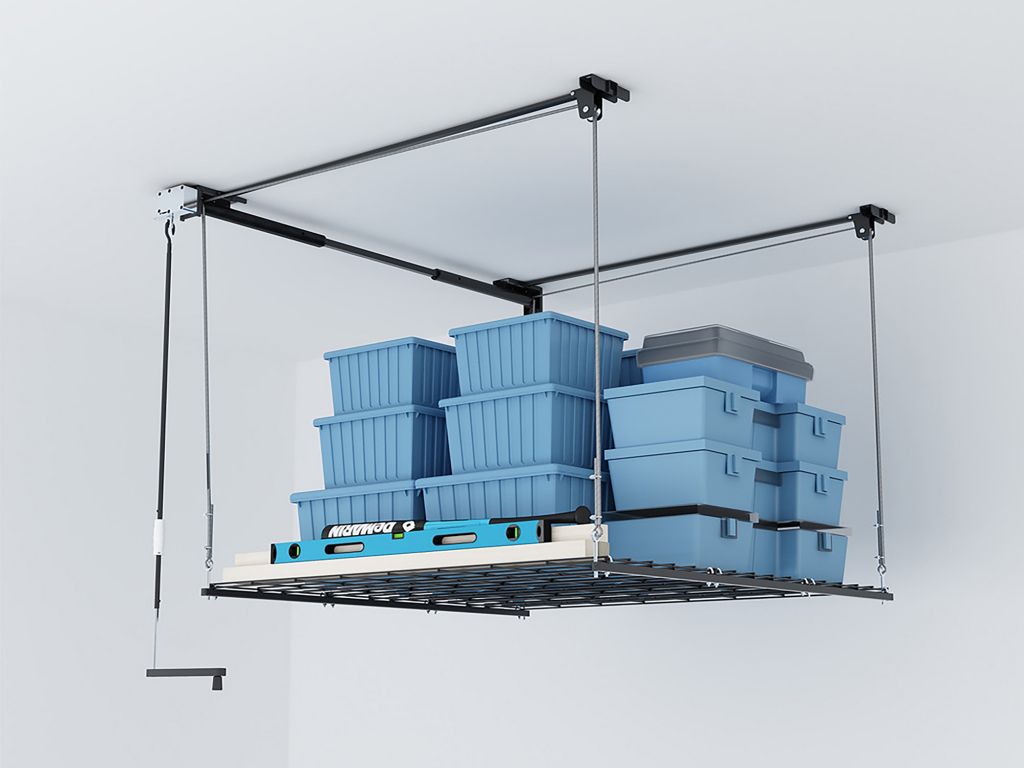
Using overhead garage storage racks eases the problem of overstoring on the valuable floor space of the garage. When things are carefully tucked away on the ceiling compartments, the ground will open up for your vehicles and activities that you will be doing inside the garage. However, the only downside is carrying the boxes onto the ceiling storage and eventually putting them down when you need something. This poses a danger to you as you might accidentally fall over to the ground due to the weight of the items lifted. In fact, 500,000 people are treated every year for ladder-related injuries and 50% of which are all ladder-related accidents due to individuals carrying items as they climbed, according to AAOS.Fortunately, Fleximounts offers the Lift 4′ X 4′ Overhead Garage Storage Rack GL44B. This storage lift removes the need for a ladder or any heavy lifting, protecting you from potential accidents. It can be raised and lowered by a crank or power drill for a smooth and effortless operation. And it eases access to your items that are high above the garage floor without using a ladder. It can lift a maximum of 108 inches vertically and can carry a maximum weight of 300 lbs.The storage lift has a safe and secure mechanism–a specially designed safety lock prevents any movement when not in use. Use the winding pole to pull out the safety lock on the gearbox, then push back in to lock after use. Moreover, the rack is made of heavy-duty steel cables, which secure the rack in place.The GL44B also boasts flexibility when it comes to compatibility with angled ceilings because of its adjustable length steel cable. Additionally, it is universally compatible with different ceiling joists of both wood joists and concrete ceilings–12”, 16”, and 24” ceiling joist spacing. However, it is not fit for metal joists.Aside from its storage capacities, the Lift 4′ X 4′ Overhead Garage Storage Rack GL44B is designed for multiple uses such as lifting hardtop, car top carrier, kayak with straps, and many more.
What’s in the box
Here are the rack parts included in the package:
1 Hand Crank
1 Winding Pole
1 Gearbox
1 Axle Support
1 Axle with Wire Rope
1 Axle Support with Bushing
2 Connecting Rods
2 Fixed Plates
2 Platform Supports
3 Wire Grids
Here are the set of screws included in the package:
1 Flange Bearing
4 M5 Bolts
1 M4 Bolt
1 Cotter Pin
2 M5 Bolts
4 M8 Bolts
2 pairs of M8 Bolts and M8 Flange Bearing
1 3x3mm Hex Key
1 5x5mm Cross Hex Key
8 pairs of M8 Nuts and M8 Flat Washers
1 M6 Socket Wrench
1 M8 Socket Wrench
2 packs of 6 St8 Tapping Screws
2 packs of 6 M8 Flat Washers
12 M6 J-bolts and Nuts
Tools needed when installing the GL44B
Wrench
Safety Glasses
Stud Finder
Screwdriver
Power Drill
Tape Measure
Pencil
Ladder
For a faster installation process, you may opt to use an electric drill for tightening the screws and bolts.
Easy step-by-step guide when installing the GL44B
Plan the location. The ceiling joist will either run front to back or side to side.
Check and ensure the spacing of two ceiling joists attaching the two ends of the connecting rod is 48”.
Assemble the gearbox. Connect the axle support to the gearbox.
Install axle supports to the ceiling joists.
Use the provided installation template to mark the mounting points.
Drill holes at the center of each point.
Install the two-axle supports using tapping screws and flat washers. Tighten with a socket wrench.
Install the axle.
Insert the side of the axle into the gearbox first and fix it with screws and nuts.
Stretch the axle to the other side and insert it into the axle support.
Insert cotter pin and bend one end of it to prevent the axle from falling off.
Install connecting rods and fixed plates.
Attach the connecting rod to the fixed plate.
Connect the other end of the connecting rod to the axle support.
Mark the holes on the fixed plate on the ceiling joist with a pencil. Then, drill holes.
Install the fixed plate to the wooden joist.
Insert the wire rope.
Pass the wire rope in the axle through the pulley in the fixed plate.
Assemble the wire grids.
Install the J-bolt and nut.
Then use them to attach the wire grids to the platform supports.
Place and attach the wire grid.
Fix the wire grid and platform supports to the eye bolt screw and tighten with a socket wrench. Note: Move nuts up or down if the frame is not horizontal. Make sure that each wire rope is under equal tension.
Place and attach the wire grid.
Place the winding pole through a loop on the gear drive.
Then fix the hand crank to the bottom of the winding pole with screws.
Before using this overhead storage rack, use the winding pole to pull out the safety lock on the gearbox. Then push inward to lock after use.
Now, you can place your items on the rack. Make sure that the heavy objects are placed evenly. Then, you can lift the rack through the hand crank or with a power drill.
Do not park a vehicle or walk directly under the overhead storage rack for at least an hour for safety purposes. This is to be sure that the unit is installed correctly. And never play on or around the rack.
How to avoid hole misalignment when installing Fleximounts ceiling racks
To prevent misalignment of holes when installing screws, do not tighten any screws until all screws are loosely installed. Then, tighten the screws one by one. Now, you can attach all the connecting plates at the joints using the bolts and tighten them with a hex key.
How to resolve an incorrect wire winding issue
When winding the first round of the wire rope, use a tool to pull the rope inward. Do the same on the other side, so the wire rope does not overlap.When lowering the wire grids, ensure at least two turns of wire rope wound on the shaft.
 What’s in the box