A fixed figure during Valentine’s is an elaborate arrangement of flower bouquets. It is definitely a butterfly-in-your-stomach feeling to get a bouquet on this special day. When your significant other gave the floral arrangement to you during the romantic dinner, you still recall the delicate aromas, the gorgeous packaging, and of course, his modest grin. Given that we have grown accustomed to this yearly practice, a Valentine's Date is actually never complete without an arrangement of flowers.
However, what happens next? When it's on display in your living room or bedroom, do you let it wither away naturally? Do you let your guilt consume you if the bouquet goes to the trash bin next?
One thing is certain, though: you want to keep the beautiful blooms around whether this is your first Valentine's bouquet or your nth time getting one. You have to give in when your emotional side takes over. Learning how to dry flowers in your garage is a good option for the given situation!
Contrary to popular belief, drying flowers is simple. Furthermore, you won't require a lot of resources to obtain the desired vintage look. When hosting guests, the charming appearance of the flowers will spark attention. It also gives your living space personality and acts as a physical remembrance of a memory that is very dear to your emotional core. Before I start listing all the reasons why you should keep dried flowers in your house in case this seems too sappy, let me start with the detailed instructions and techniques you may use to preserve flowers.
Drying Flowers Method 1: Air Dry
The air-drying process is the first option. This approach is the easiest and most common, but it also takes the longest amount of time because of the waiting time. Simply hanging the arrangement upside down will allow nature to handle the majority of the job of drying the flowers. Lavender, sunflowers, baby's breath, and roses are the flowers that usually work best with them. You are conserving their original structure by hanging them in this posture. The stems would only bend if they were hung upright, and the petals would fall off owing to gravity.
Start by trimming the flower stalks of any superfluous leaves or other foliage. You can choose to keep some leaves, though, to give the blooms some texture. The stems must not be shorter than six inches when chopped to the correct length. To preserve the color of the flowers during the drying process, make sure to stay working away from the sun. Use a rubber band or piece of yarn to bind the stems together. Select a dry, obscure location within the garage. Then, suspend them from a stick, hanger, horizontal pole, or Fleximounts Garage Hook by hanging them upside down.
Now, give the flowers at least two weeks to thoroughly dry out. To preserve them in perfect shape when they have fully dried, mist them with unscented hairspray. Now you may put them on display, but make sure it's not in a place where the sun will be directly on them.
Drying Flowers Method 2: Microwave
To preserve the shape and color of the flowers using this approach, you will need to purchase silica gel. Although it takes longer than just heating the silica gel in the microwave, it is possible to preserve flowers using solely this method. Individual flower blooms like chrysanthemums, tulips, roses, and daisies respond well to this technique.
Compared to air drying, silica gels are more effective in maintaining the flowers' structure and color. Additionally, because the gels are reusable, there is no need to purchase them every time you want to dry a flower. Online and craft stores both have them readily available.
Choose a large enough container that is microwave-safe, fits in the microwave and can hold the flower. Put a thin layer of silica gel inside the container after that. Spread the remaining silica gel evenly over the surface, then add the flower. You want the flowers to seem as solid as they do when they are fresh, so make sure to carefully pour the gel over them in order to avoid denting their natural shape.
After that, put the microwave-safe container in the oven. Start with a low heat setting, and then leave it running for 2 to 5 minutes at a time, in 30-second increments. The length of time depends on the size and kind of flower. Prior to increasing the heat or the time, make sure the blossom is dry. Let the flower rest for 24 hours once it has completely dried. Your container should be partially covered to allow for ventilation. The gels are then removed with a gentle brush. Spritz unscented hairspray on the flowers for protection.
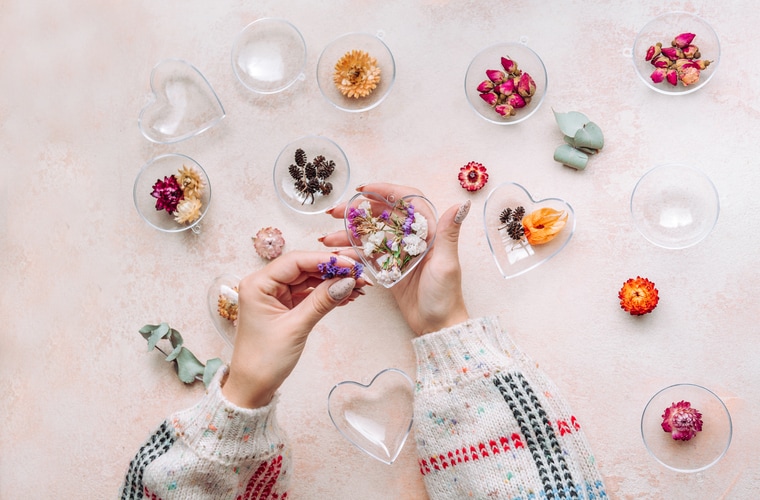
Drying Flowers Method 3: Book Press
The flowers will be flattened when you press them, which is not ideal if you want to display the dried flowers in a vase. However, you can also use epoxy resin to create pendants and other ornamental objects by doing some DIY projects. These will also look excellent on frames as table or room decors. For smaller blooms, this approach works well.
Start by raking up any undesirable leaves. Put absorbent materials like baking sheets or watercolor paper on the pages of the book. On a piece of parchment paper, place the flower blooms facing down. Place a second parchment sheet on top of the flowers, and sandwich them between the absorbent sheets. Afterwards, put the notepad or book away. You will see that the book is still not closed all the way. The book with flowers may be topped with other books. After that, let them dry for at least three weeks in a secure area away from moisture and direct sunshine.
You may put the heavy books on top of the Fleximounts Workbench, which can support up to 3,000 lbs, due to its high weight capacity. If you are drying several flowers at once, this makes the most sense.